Lock Cells in Excel
The simplest way to Lock Cells in Excel is to protect the entire worksheet and this will prevent others from deleting or editing the content in any of its Cells. However, locking all Cells in Excel by protecting the entire worksheet prevents others from working on it. Hence, this method is not suitable if you are sharing the worksheet with others or you want others to be able to work on the worksheet. Luckily, it is also possible to Lock Specific Cells in Excel and this will prevent others from making changes only in those selected Cells.
1. Lock All Cells in Excel Worksheet
As mentioned above, you can Lock all cells in Excel by protecting the Worksheet. By default, all the Cells in a Protected worksheet are locked.
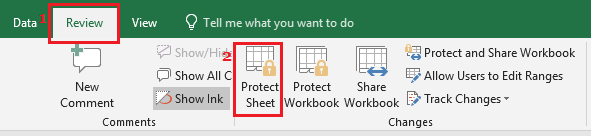
Click on the Review tab and then click on Protect Sheet option in the “Changes” Group.
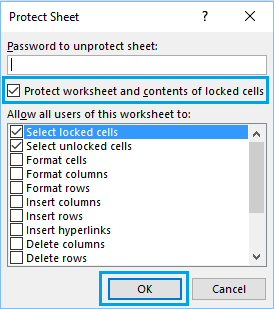
In the Protect Sheet box that appears, select Protect worksheet and contents of locked cells option > Enter a Password (optional) > select actions that you want to allow (Select Locked Cells, Select Unlocked Cells, etc) and click on OK.
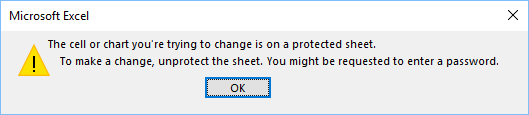
If you had typed a Password, you will be prompted to reconfirm the password. Once the worksheet is protected, all the Cells in the worksheet will be locked and Excel will display “The Cell or Chart you’re trying to open is on a protected sheet” message, whenever anyone tries to modify the worksheet.
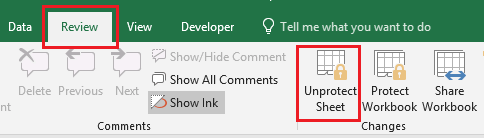
In case you want to edit the Cells, you will have to first Unprotect the worksheet by clicking on Review tab > Unprotect Sheet.
Note: You will be required to enter a Password, in case the worksheet that you are trying to unlock was protected using a Password.
2. Lock Specific Cells in Excel
Follow the steps below to Lock only certain selected or specific cells in Excel worksheet.
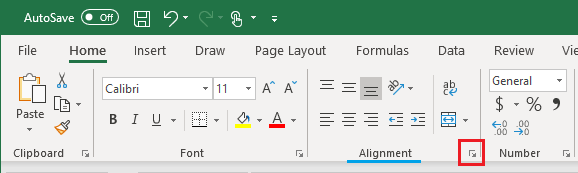
Select the entire sheet and click on the dialog box launcher icon located in the “Alignment” Group of the Home Tab.
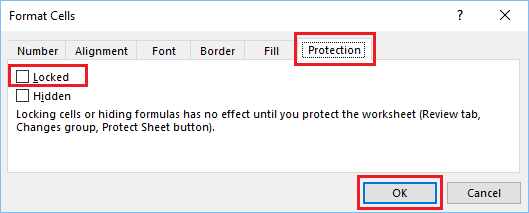
In Format Cells dialog box, click on the Protection tab and uncheck the Locked box.
Click on OK to save the changes.
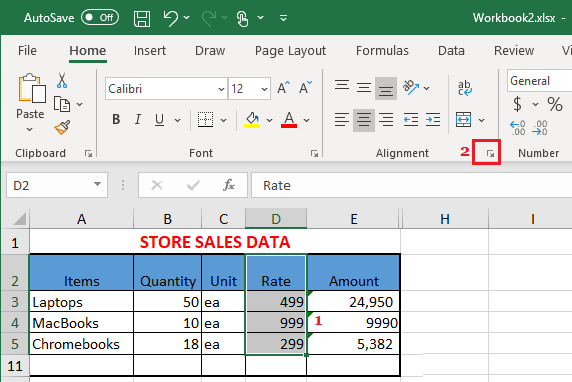
Now, select only the Specific Cells that you want to Lock and click on the dialog box launcher icon located in Alignment group of the Home Tab.
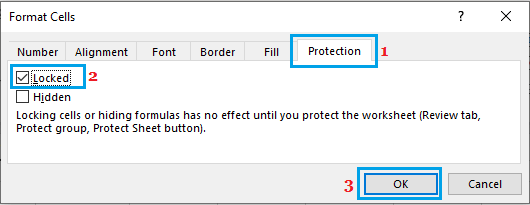
In this case, we have selected Cells D2 to D5 to prevent others from making changes to Rates in the worksheet. 5. In the Format Cells Dialog box, click on the Protection tab and select the Locked option.
Next, click on the Review tab and click on Protect Sheet option in “Changes” group.
On Protect Sheet screen, select Protect worksheet and contents of locked cells option > select the actions that you want to permit on this worksheet (Select Cells, Insert rows, Format Cells, etc) and click on OK to save the settings.
After this only the selected Cells will become locked in the worksheet and all other cells will be unlocked. Also, users will be able to work on the worksheet and perform all permitted actions that you had selected in Protect Sheet window.
3. Hide Formula in Locked Cells
Even if a Cell is locked in Excel, the formula in the Locked cell becomes visible when anyone clicks on the Locked Cell. Follow the steps below to Lock Cells and also hide the Formula in them.
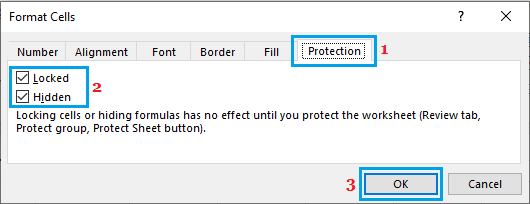
Select the Cells that you want to Lock and Hide the Formula and click on the dialog box launcher icon located in Alignment section of the Home Tab.
In Format Cells window, check both Locked and Hidden options.
Click on OK to save this setting. This will Lock the selected cells and also hide the Formula, when someone selects or clicks on the Locked Cells.
Protect Sheet Option Grayed Out in Excel
If you find that the Protect Sheet option is grayed out, it likely that you are dealing with a shared worksheet. In order to fix this issue, you will have to disable sharing on the workbook.
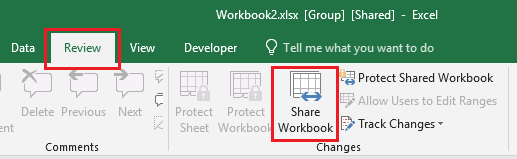
Click on the Review tab and click on Share Workbook option in the “Changes” group.
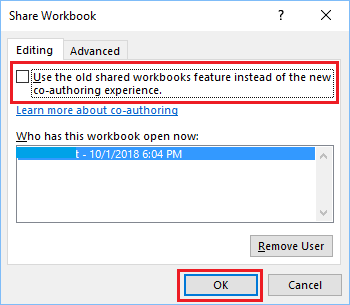
On Share Workbook window, uncheck Use the old Shared workbooks feature… or Allow changes by more than one user… option and click on OK.
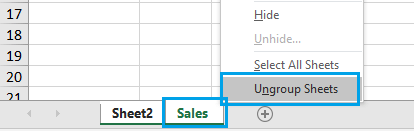
The Protect Sheet option in Excel can also be grayed out due to multiple worksheets being selected. To fix this, right-click on any worksheet tab and click on Ungroup Sheets option in the menu that appears.
Hope this has provided you with a good understanding of how to Lock Cells in Excel and protect your work.
How to Hide Cells, Rows and Columns In Excel How to Merge and Unmerge Cells in Excel